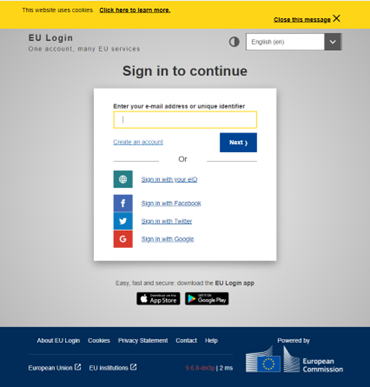
Connecting to eKidWeb
Login to eKidWeb requires an
EU Login
account.
Access is possible with a professional e-mail address or a private e-mail address.
Before logging in please read the instructions below.
You have a professional e-mail address from the European institutions/agencies (excepted BEI, FEI, European Schools)
You can check your EU Login account linked to this email address (or create it if necessary)
by clicking here
.
You can then connect directly to eKidWeb.
You have an external e-mail address (e.g.: gmail) or BEI, FEI, European Schools
You can create or verify your EU Login account using an external e-mail address by clicking here .
It is then necessary to communicate the following information to the CPE so that it can initialize your account:
- Name
- First name
- Gender
- Civil status
- GSM
- Private mailing address
- E-mail address used to create EU Login
If you have difficulties logging in, please contact the CPE ( oil-cpe-ma@ec.europa.eu for Mamer; oil-cpe-ki@ec.europa.eu for Kirchberg).
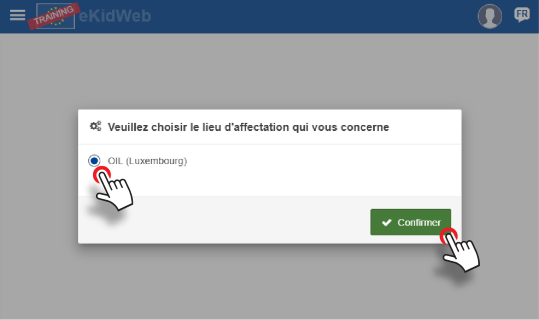
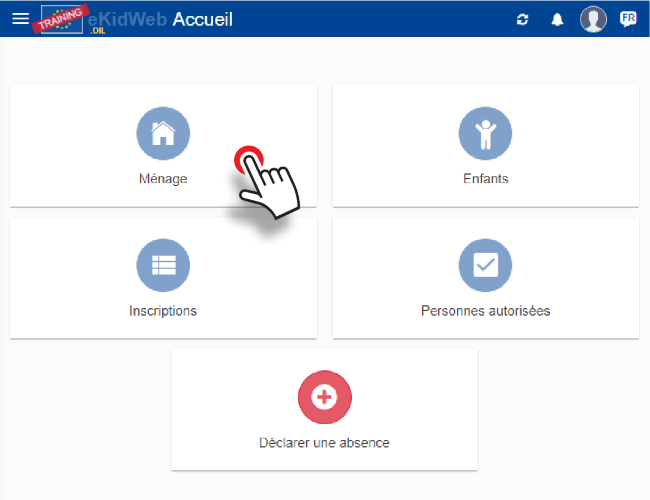
Household creation
1. Choose your site
2. Click on "start here"
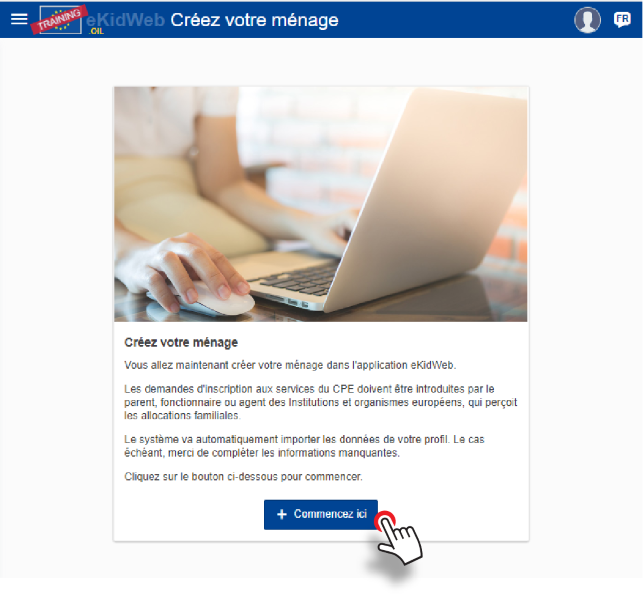
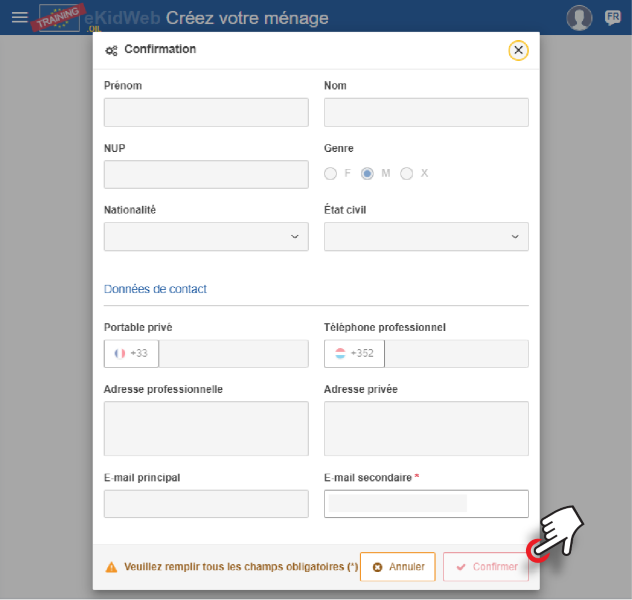
3. Create your household
- If the paying parent data is imported by default, verify the encoded information. Otherwise, encode the data
- Complete required contact data fields (*)
- Click on "confirm"
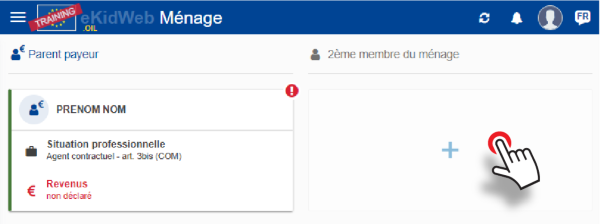
4. Create the 2nd household member
From the home page, click on "Household"
- Click "+" to encode the 2nd member
- Select default proposed member or encode if necessary and confirm
- Complete contact data (*)
- /!\ Do not click on "income - not declared" at this point
- /!\ Do not insert supporting documents at this point
- Click on "confirm"
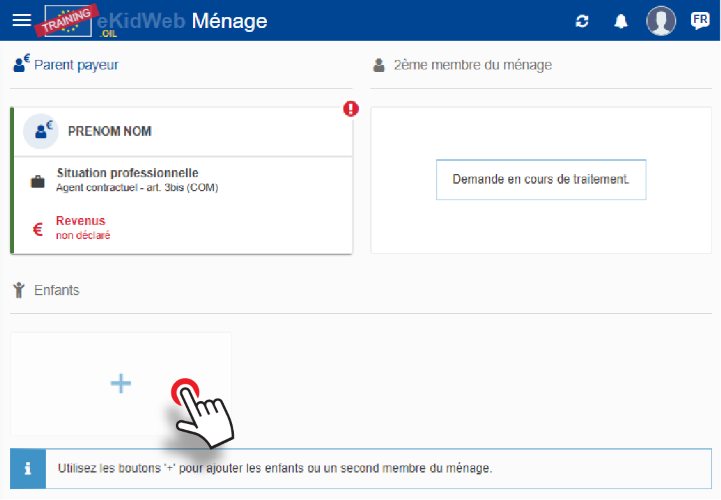
- Request being processed (to be validated by the CPE Administration)
5. Add a child
- Click "+" to encode a child
- If the child's data is imported by default, check the encoded information. Otherwise, enter the data.
- If another child needs to be entered, repeat the same operation.
- Choose the language(s) spoken
- Click on "confirm"
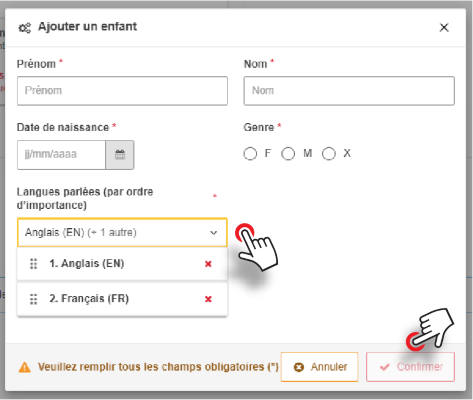
After adding a child, the application will ask you to define their legal guardians.
The household encoding procedure is now complete, please start the registration procedure.
CPE Enrolment
List of supporting documents required for registration
- Certificate from the institution (mandatory)
- Latest payslip of the paying parent (mandatory)
- Working time less than 100% (proof of the work pattern)
- In the event of divorce (the divorce decree and supporting financial documents)
- Second member of the household’s latest payslip/other supporting document or self-declaration “single-parent family” (mandatory)
For more details, please see this page .
1. Proceed with enrolment
- On the home screen, click on "Children", then click on the name of the concerned child.

- On the "Enrolments" line, click on the "+" sign: New enrolment

- Check the box corresponding to the chosen enrolment type:
- Année scolaire + Droit vacances 20xx-20xx
- Droit vacances 20xx

The choice "Année scolaire + Droit vacances" includes enrolment for the school year as well as the right to enrol during the European School's holiday periods.
The choice "Droit Vacances" allow enrolment to the CPE during the European School's holiday periods.
3. Enrolment process
New enrolment in 6 steps to complete:
- School and site
- Attendance (this step does not appear in case of enrolment "holiday right")
- Optional services
- Consents
- Documents
- Medical
Review each step one by one, filling in the fields with the requested information and validate by clicking "Next".
3.1 School and site

3.2 Attendance
- /!\ Tick the selected days of attendance (they can be modified at any time during the school year)
- Click Next

3.3 Optional services
- Confirm having take note of the information provided
- Click on "Next"

3.4 Consents
- Complete the fields related to photo consents, CPE rules on admission, and implementing rules
- /!\ Please read the informative text in each informative bubble in the 4 consents.
- Click on "Next"

3.5 Documents
- Click on "Upload a document" to upload the required documents for your child's enrolment.
- Check the list of supporting documents for more information.
- Click on "Next"

3.6 Medical
- Click on "Upload a document" to download your child's medical documents
- In the subfolders, open the files one by one and fill in the information.

3.7 Confirmation
- Check the registration data that appears on the screen
- If the data is correct, click "Confirm", otherwise click "Previous" to modify the information.

- End of the procedure and submission of the application to the administration of the CPE
- Receipt of a confirmation message, a refusal or placement on a waiting list
/!\ In case of missing document or additional question on the file, the CPE administration will contact you.
Possibility to follow the progress of the registration file by clicking on "Child" on the home page.
Re-enrolment
1. Proceed with re-enrolment
- On the home screen, click on "Children", then click on the name of the concerned child.

- On the "Enrolments" line, click on the "+" sign: New enrolment

- Check the box corresponding to the chosen enrolment type:
- Année scolaire + Droit vacances 20xx-20xx
- Droit vacances 20xx

The choice "Année scolaire + Droit vacances" includes enrolment for the school year as well as the right to enrol during the European School's holiday periods.
The choice "Droit Vacances" allow enrolment to the CPE during the European School's holiday periods.
2. Re-enrolment process
Re-enrolment in 5 steps to complete:
- School and site
- Attendance (this step does not appear in the case of "Droit Vacances" re-enrolment)
- Optional Services
- Consents
- Medical
Review each step one by one, filling in the fields with the requested information and validate by clicking "Next".
2.1 School and site
- Complete the data in all different sections (school, language section, school level, CPE site) via the dropdown menus
- Click on "Next"

2.2 Attendance
- /!\ Check the selected attendance days (they can be modified at any time during the school year)
- Click on "Next"

2.3 Optional Services
- Confirm having take note of the information provided
- Click on "Next"

2.4 Consents
- Complete the fields related to photo consents, CPE rules on admission, and implementing rules
- /!\ Please read the informative text in each informative bubble in the 4 consents.
- Click on "Next"

2.5 Medical
- Check the child's medical data by reviewing all subfolders
- Click on "Next"

2.6 Confirmation
- Check the enrolment data displayed on the screen
- If the data is correct, click "Confirm", otherwise click "Previous" to modify the information.

- End of the procedure and submission of the re-enrolment request to the CPE administration
- Confirmation, refusal or request placed on a waiting list will be sent by email
Holiday period enrolment
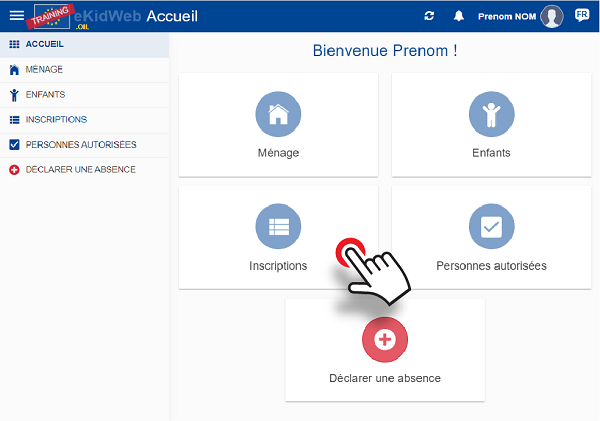
1. Enrolment creation
Start from the homepage: click on "Enrolments" to begin
2. Enrolment encoding
- Click "+" to encode an enrolment
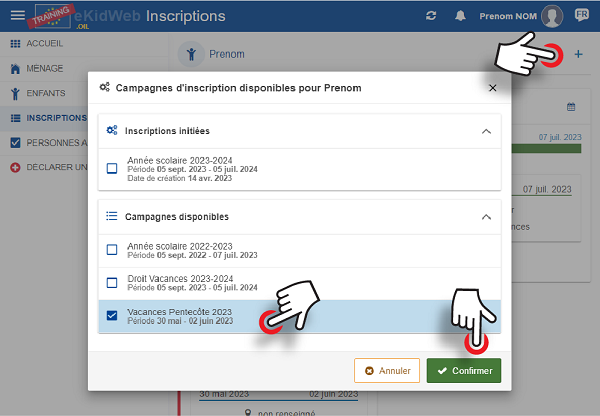
- Click to choose the desired enrolment campaign
- Click "Confirm"
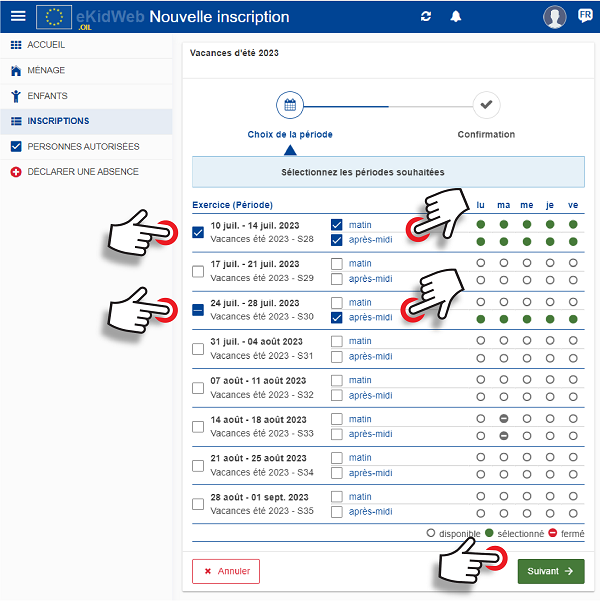
3. Attendance
- Click to choose the desired weeks
- Click to choose the desired attendance mode (morning+meal, afternoon, or full day).
- Click "Next"
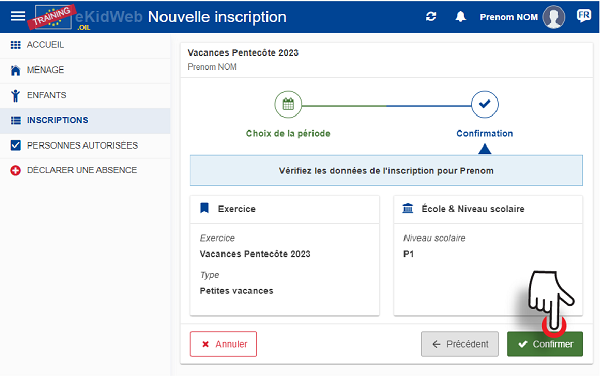
4. Confirmation
- Verify the information
- Click "Confirm"
5. Enrolment validated
- The enrolment is automatically validated.

Cancellation of Enrolment
Before the start of the school year
Cancellations are free of charge if requested by email to the CPE's administrative department by 15 August at the latest.
Please contact the CPE ( oil-cpe-ma@ec.europa.eu for Mamer; oil-cpe-ki@ec.europa.eu for Kirchberg).
During the school year
A request to end attendance must be made via your eKidWeb account.
Cancellation of an "Holiday" enrolment
It is possible to cancel an "Holiday" enrolment (short breaks or summer holidays) until the last day of the corresponding enrolment campaign.
- Click on "Children" then on the name of your child
- Click on "Enrolments"
- Click on the 3 vertical dots on the card of the relevant enrolment and choose "Cancel the request"

Delegation to the second household member
You are the paying parent:
- Click on "Household"
- Click on the name of the 2nd household member
- Click on the lock icon to "delegate to …"
- Check the box that says "I confirm that I would like..."
- Click on "confirm"


Authorised persons
- Click on "Children" then on the name of your child
- Go to "Authorised persons" and click on "+"
- Fill in the fields marked with *
- Select the name of the concerned children
- By default, the authorisation will be permanent. If you need to activate it during a defined period, please, deselect the button "permanent" and indicate the start and end date of the authorisation.
- Click on "confirm"


Add an exit permission
Recurring exit permissions allow children to:
- leave the CPE alone
(to go home or to an extracurricular activity, to take a bus, etc...) - leave the CPE alone and come back alone
(to attend an extracurricular activity or a weekly appointment, etc...) - Arrive later at the CPE alone or accompanied
(after an extracurricular activity or a weekly appointment, etc...), the child is not picked up from school.
The schedules must be strictly observed.
These are recurring weekly authorisations. In case of an ad hoc authorisation, please contact the administrative team of the concerned site by email.
If your child takes part in an APEEEL activity, please check the site and structure specifications BEFORE submitting an authorization:
-
Kirchberg - P1 Groups (CPE1)
-
Kirchberg - Groups located on the ground floor or 1st floor (CPE3)
-
Kirchberg - Groups located on the 2nd floor (CPE3)
-
Mamer
The encoding steps in eKidWeb are as follows:
- Click on "Children" then on the name of your child
- Go to "Recurring Exit Permission" and click on "+"
- Select the type of authorisations
- Fill in the fields marked with *
- Click on "Confirm"


| Level |
Option 1 "Quitte seul le CPE" (Leaves the CPE alone) |
Option 2 "Quitte et revient seul au CPE" (Leaves and comes back alone) |
Option 3 "Arrivée tardive" (Late Arrival) |
|---|---|---|---|
| Garderie (GA) (preschool - M2) |
This type of permission is not allowed for young children. | This type of permission is not allowed for young children. | The child arrives at the CPE (maximum 6 p.m.), accompanied* by an authorised person. |
| Study and Recreation Centre (CEL) - Primary (P1 – P5) |
The child leaves the CPE alone, with no return on the same day. | The child leaves the CPE alone, and comes back later (maximum 6 p.m.). | The child arrives later at the CPE (maximum 6 p.m.), alone or accompanied*. |
| Study and Recreation Centre (CEL) - Secondary (S1 – S3) |
Children can come and leave the CPE alone by identifying themselves with the guard at the entrance of the CPE.
Exit permission is not requested. |
Children can come and leave the CPE alone by identifying themselves with the guard at the entrance of the CPE.
Exit permission is not requested. |
Children can come and leave the CPE alone by identifying themselves with the guard at the entrance of the CPE.
Exit permission is not requested. |
* Declare the authorised person(s) to drop off the child (third party or APEEEL staff) via the "authorised persons" menu in eKidWeb.
Shuttles
- Click on "Children" then on the name of your child
- Go to "Shuttles" and click on "+"
- Select the shuttles used by your child
- Enter any comments if applicable
- Click on "confirm"


End of attendance
- Click on "Children" then on the name of your child
- Click on the 3 vertical dots in the card named "Année scolaire + Droit vacances 20xx/20xx" and choose "Request for end of attendance"
- Select the last month for which your child will attend the CPE
- Click "Confirm". You will receive an email notification once the request has been processed by the CPE


As stated in the implementing procedures of our regulations, this must be notified no later than the 15th of the month for which the end of attendance is desired (e.g. no later than 15 November for an end of attendance date of 30 November. From 16 November onwards, attendance will end on 31 December). The end date of attendance is always the last day of the month. The "holiday right" ("Droit vacances") remains available for the rest of the current school year.
Changing attendance
- Click on "Children" then on the name of your child
- Click on the 3 vertical dots in the card named "Année scolaire 20xx/20xx" and choose "Changing attendance"
- Indicate the effective starting date (by default, the next working day is indicated)
- Select the day(s) when your child will attend the CPE (deselect the day(s), he/she will not). Leave a comment, then confirm the modification.
- Click on "confirm"


Check the weekly attendance
- Click on "Children" then on the name of your child
- Click on the calendar button next to "Enrolments"

The blue circles indicate your child's attendance days:

Absence notification
Click on the "Report an absence" button :

- Check the box for the child to be declared absent
- Indicate the period of absence under "Period" by choosing the dates in the calendar
- The absence notification of the day is possible until 11:30 (after this time, the CPE administration must be informed)
- Possibility to request a refund for an absence greater than 5 days or in case of stay abroad by checking the box
- Click Confirm
- Receipt of confirmation message "Information saved successfully"

View notified absences
- Click on "Children" then on the name of your child
- Click on the calendar button next to "Enrolments"

The notified absences are indicated by a yellow sign.

Change the medical information
- Click on "Children" then on the name of your child
- Click on "Medical Information"
- Navigate through the different subfolders to download the requested documents and/or fill in necessary information:
- Documents
- Important Information
- Problems and Disorders
- Chronic Conditions
- Ongoing Medication and Treatment
- Other Useful Information
- Click "Save" to record all medical data."


My child's group
- Click on "Children" then on the name of your child
- View the name of the group in which your child is placed in the information on the registration "card":
